
Saturday, January 14, 2012
Black And White
Made the rest of the checker-board sashing for the bright quilt:
 Sixty strips ready to be sewn together in pairs. It seemed much less fiddly to me to do it this way than to make individual four-patches then sew them together in sets of four for each sashing section.

Friday, January 13, 2012
Strobilanthes Mystery
Earlier this week I cut off some of the spent flowers of my Strobilanthes gossypinus and brought them inside to get a closer look at them. This morning I found a couple of these outside the bag containing the pieces:
 One was over 30cm from the bag they were in. I am assuming they flew out as a result of a seed pod popping open. But is this the seed?
My search for information about the seed was not successful, but Joseph from Greensparrow Gardens sent me a link to this page which shows the seeds (scroll to the bottom) of a related plant, the Persian Shield (Strobilanthes dyerianus). So it looks like what I have here may just be part of the pod, which launches the seed away from the parent. And I haven't found anything that looks like those Persian Shield seeds.
However, I still have a few un-popped pods, such as the one on the left here:
 I've also collected up all the remaining flower-heads from the plant, in the hope of capturing at least some seeds. Stay tuned...

My search for information about the seed was not successful, but Joseph from Greensparrow Gardens sent me a link to this page which shows the seeds (scroll to the bottom) of a related plant, the Persian Shield (Strobilanthes dyerianus). So it looks like what I have here may just be part of the pod, which launches the seed away from the parent. And I haven't found anything that looks like those Persian Shield seeds.
However, I still have a few un-popped pods, such as the one on the left here:

Thursday, January 12, 2012
Progress
This is where I'm up to with the top I started cutting out yesterday:
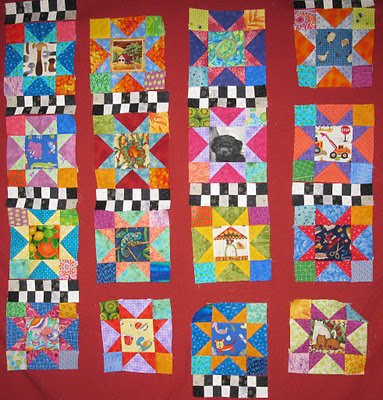 As I mentioned yesterday, this design is by Bonnie Hunter. She calls it "Story-Time Stars". I've used my own measurements, and added more variation in the blocks than Bonnie used, but I hope mine will be as appealing as hers when it's done.
This is all the blocks, but I've still got lots of sashing to make. The arrangement isn't final - in fact a few blocks have already been moved since I took the picture.

This is all the blocks, but I've still got lots of sashing to make. The arrangement isn't final - in fact a few blocks have already been moved since I took the picture.
Wednesday, January 11, 2012
Metric Flying Geese
This morning as I was eating breakfast and internetting, I found Bonnie Hunter had posted a free quilt pattern that just appealed to me. I sketched the block and made a quick note of the details, and headed off to my sewing room.
The first thing I did was work out what size I wanted to make the blocks - in metric measurements. I don't like inches! The one thing that I wasn't sure about was the flying geese. I wanted to use what is sometimes called the "no waste" method - where you cut one large and four smaller squares, then sew them together and cut them apart in strange ways, to create four flying geese units:
 If you've never tried this, do a quick google and you will find heaps of sites with the instructions (in inches).
But I had no idea what sizes those squares should be, or why. I have used this method once before, following a pattern in inches, but I just cut and didn't think then about what was going on with those weird measurements. Today I sat down and worked it out, and felt quite a sense of achievement! Now I can cut any size flying geese units I want, without following a pattern.
Basically, the large square is going to end up cut into four quarter-square triangles, and the smaller squares will each be cut in half to create two half-square triangles. So, if you know the finished size of your flying geese units, you add the appropriate extra seam allowance amounts to cut the squares. For metric patchwork, using a .75mm seam allowance, these numbers are easy to remember:
At the end of the day, I'd done a lot of cutting, and not much sewing, but I had quite a sense of achievement!

The first thing I did was work out what size I wanted to make the blocks - in metric measurements. I don't like inches! The one thing that I wasn't sure about was the flying geese. I wanted to use what is sometimes called the "no waste" method - where you cut one large and four smaller squares, then sew them together and cut them apart in strange ways, to create four flying geese units:

But I had no idea what sizes those squares should be, or why. I have used this method once before, following a pattern in inches, but I just cut and didn't think then about what was going on with those weird measurements. Today I sat down and worked it out, and felt quite a sense of achievement! Now I can cut any size flying geese units I want, without following a pattern.
Basically, the large square is going to end up cut into four quarter-square triangles, and the smaller squares will each be cut in half to create two half-square triangles. So, if you know the finished size of your flying geese units, you add the appropriate extra seam allowance amounts to cut the squares. For metric patchwork, using a .75mm seam allowance, these numbers are easy to remember:
- 1.5cm for squares and rectangles
- 2.5cm for half-square triangles
- 3.5cm for quarter-square triangles
At the end of the day, I'd done a lot of cutting, and not much sewing, but I had quite a sense of achievement!

Tuesday, January 10, 2012
New Growth
My Eucalyptus leucoxylon, the only one of my eucalypts to survive the water-logged soil, has started growing again. That's a relief, but it hasn't taken long for the insect world to find the new growth:
 Probably sawfly larvae, species unidentified.

Monday, January 9, 2012
Hope
Last May, I posted a picture of the flower I didn't want to see, on my Strobilanthes gossypinus. Didn't want, because this plant is said to die after flowering. Now the flowers are finished, and there is no green left on the plant, its leaves have all gone brown. It doesn't look like something that will grow again:

However, if you look closely at some of the spent flower heads, there are hard, chestnut-coloured things which look like they might be seeds:

The next challenge will be working out how to get them growing.

However, if you look closely at some of the spent flower heads, there are hard, chestnut-coloured things which look like they might be seeds:

The next challenge will be working out how to get them growing.
Sunday, January 8, 2012
Kaleidoscope Quilt Finished
It has taken quite a while, but this quilt is no longer a UFO:
 "Stack-n-whack" kaleidoscope quilt, approx 2m by 155cm.
The blocks were pieced in about 2001, after I watched an episode of "Simply Quilts" featuring the inventor of the "stack-n-whack" technique, Bethany Reynolds. I loved the idea, and went straight to my fabrics to see if I had anything I could use to try it. I only had enough of one fabric to get the six design repeats I needed. I chose the dusky pink for the triangles because the main fabric has touches of that pink through it. The blocks then sat around for a number of years. I didn't have enough of the same fabric to turn the top into a rectangular shape, and didn't know what to do.
In about 2006 or 2007 I found another Japanese fabric with a black background and the same pink, which I used to fill in a few gaps and create the rectangle shape. A friend gave me the fabric I've used in the border, which I do think is an ugly fabric, but it seems to work. (The same friend also had some of the pink fabric which she gave me to use for the binding.) But I didn't have anywhere to spread out the quilt to baste it.
In 2008, I was told about Sharon Schamber's basting method using two planks of wood. (You can watch her videos on YouTube; here's Part 1.) With this method, you don't spread the whole quilt out, so I was able to baste the quilt on my kitchen table. I did that in about the middle of 2008, and started to do some of the quilting, but it was giving me problems, so I put it aside yet again.
In October last year, I got back to it, and now, finally, it is done!

The blocks were pieced in about 2001, after I watched an episode of "Simply Quilts" featuring the inventor of the "stack-n-whack" technique, Bethany Reynolds. I loved the idea, and went straight to my fabrics to see if I had anything I could use to try it. I only had enough of one fabric to get the six design repeats I needed. I chose the dusky pink for the triangles because the main fabric has touches of that pink through it. The blocks then sat around for a number of years. I didn't have enough of the same fabric to turn the top into a rectangular shape, and didn't know what to do.
In about 2006 or 2007 I found another Japanese fabric with a black background and the same pink, which I used to fill in a few gaps and create the rectangle shape. A friend gave me the fabric I've used in the border, which I do think is an ugly fabric, but it seems to work. (The same friend also had some of the pink fabric which she gave me to use for the binding.) But I didn't have anywhere to spread out the quilt to baste it.
In 2008, I was told about Sharon Schamber's basting method using two planks of wood. (You can watch her videos on YouTube; here's Part 1.) With this method, you don't spread the whole quilt out, so I was able to baste the quilt on my kitchen table. I did that in about the middle of 2008, and started to do some of the quilting, but it was giving me problems, so I put it aside yet again.
In October last year, I got back to it, and now, finally, it is done!
Subscribe to:
Posts (Atom)


